
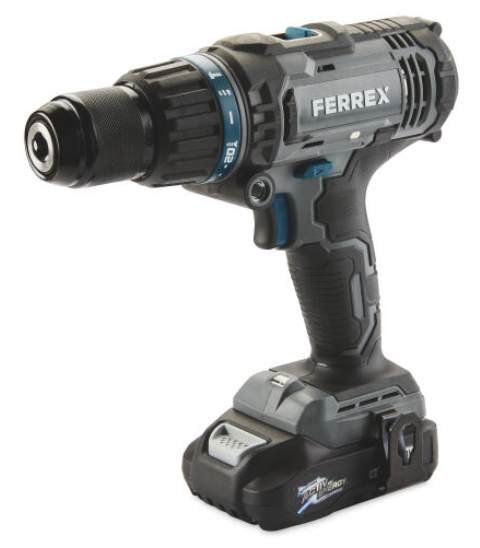
Ferrex 20V Cordless Combi Drill
- Ergonomic design with soft grip
- No-load speed: 0-440 / 0-1650 rpm
- Impact rate: 0-7040 / 0-26,400 bpm
- Max torque: 50Nm
- Electronic speed regulation
Unleashing Power and Precision in Your Hands
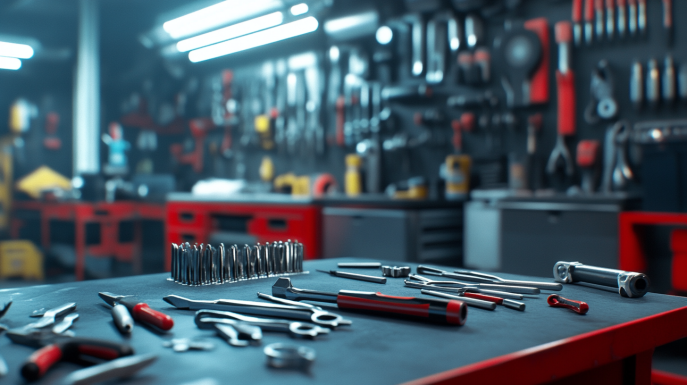
In the world of do-it-yourself projects and home improvements, a reliable drill is your trusty sidekick. Enter the Ferrex drill – a powerhouse tool that’s been making waves in the DIY community. Whether you’re a seasoned handyman or a weekend warrior, this comprehensive guide will walk you through everything you need to know about choosing, using, and maintaining your Ferrex drill. So, let’s dive in and unlock the potential of this game-changing tool!
The Ferrex Drill: Your New Best Friend
Picture this: You’re standing in front of that IKEA bookshelf you’ve been meaning to assemble for weeks. The instructions are spread out on the floor, and you’re ready to tackle this project head-on. But wait – you’re missing something crucial. That’s right, a high-quality drill that can make your DIY dreams a reality. Enter the Ferrex drill, your new best friend in the world of home improvement.
Ferrex drills have been gaining popularity among DIY enthusiasts and professionals alike, and for good reason. These tools offer a perfect blend of power, precision, and affordability that’s hard to beat. But with so many options out there, how do you choose the right one for your needs? Don’t worry – we’ve got you covered!
Types of Ferrex Drills: Finding Your Perfect Match
Just like there’s no one-size-fits-all approach to DIY projects, Ferrex offers a range of drills to suit different needs. Let’s break down the main types:
- Cordless Drills: The freedom fighters of the drill world. These battery-powered beauties allow you to move freely without being tethered to a power outlet. Perfect for those hard-to-reach spots or outdoor projects.
- Corded Drills: The powerhouses. If you need consistent, high-power performance for heavy-duty tasks, a corded Ferrex drill might be your best bet.
- Hammer Drills: The tough guys. These drills have an additional hammering action, making them ideal for drilling into masonry or concrete.
- Combi Drills: The jack-of-all-trades. Combining the functions of a standard drill and a hammer drill, these versatile tools can handle a wide range of tasks.
When choosing your Ferrex drill, consider the types of projects you’ll be tackling most often. Are you mostly assembling furniture and hanging pictures? A standard cordless drill might be perfect. Planning on some serious renovation work? You might want to opt for a corded hammer drill.
Where to Buy Your New Ferrex Drill
Now that you’re excited about getting your hands on a Ferrex drill, you’re probably wondering where to find one. Ferrex drills are typically available at major home improvement stores and online retailers. Keep an eye out for sales, especially during holiday seasons or big shopping events like Black Friday. Pro tip: Sign up for newsletters from your favorite retailers to stay informed about upcoming deals!
Price Range: Balancing Quality and Budget
One of the great things about Ferrex drills is their affordability. Prices can range from around $50 for a basic cordless model to $200 or more for a high-end hammer drill. Remember, the most expensive option isn’t always the best for your needs. Consider your budget and the features you’ll actually use before making a decision.
Unleashing the Power: How to Use Your Ferrex Drill
So, you’ve got your shiny new Ferrex drill. Now what? Here’s a quick guide to getting started:
- Charge it up: If you’ve got a cordless model, make sure it’s fully charged before first use.
- Choose the right bit: Select a drill bit that matches your project needs.
- Adjust the torque: This controls the power of the drill. Lower settings are great for delicate work, while higher settings are better for tougher materials.
- Set the speed: Most Ferrex drills have variable speed settings. Lower speeds are good for precise work, while higher speeds are better for quick drilling.
- Get drilling: Hold the drill steady and apply gentle pressure. Let the drill do the work – don’t force it!
Remember, practice makes perfect. Start with some scrap wood to get a feel for your new tool before tackling bigger projects.
Changing the Drill Bit: A Simple But Crucial Skill
Knowing how to change your drill bit is essential for any DIY enthusiast. Here’s how to do it with your Ferrex drill:
- Ensure the drill is unplugged or the battery is removed.
- Locate the chuck (the part that holds the drill bit).
- For keyless chucks, simply twist to loosen or tighten.
- For keyed chucks, use the provided key to loosen or tighten.
- Remove the old bit and insert the new one, making sure it’s straight and secure.
- Tighten the chuck.
Voila! You’re ready to tackle a new drilling task.
Troubleshooting Your Ferrex Drill: When Things Don’t Go As Planned
Even the best tools can sometimes act up. Here are some common issues and how to solve them:
- Drill won’t turn on: Check the power source. For cordless models, ensure the battery is charged and properly inserted.
- Drill is underpowered: You might need to charge the battery or choose a higher torque setting.
- Drill bit is slipping: The chuck might not be tight enough. Re-tighten it.
- Unusual noises: This could indicate a problem with the gears or motor. If basic maintenance doesn’t help, it might be time for professional repair.
Remember, safety first! If you’re unsure about a problem, it’s always best to consult a professional.
Maintaining Your Ferrex Drill: Keeping It in Top Shape
A well-maintained drill is a long-lasting drill. Here are some tips to keep your Ferrex drill in prime condition:
- Clean after each use: Wipe down the drill and remove any dust or debris.
- Lubricate moving parts: A drop of machine oil on the chuck and other moving parts can keep things running smoothly.
- Store properly: Keep your drill in a dry place, ideally in its carrying case if provided.
- Check the cord: For corded models, regularly inspect the cord for any damage.
- Battery care: For cordless models, avoid completely draining the battery and store it at room temperature.
With proper care, your Ferrex drill can be your trusted DIY companion for years to come.
Safety First: Protecting Yourself While You Work
Ferrex drills come with several safety features, but it’s important to use them correctly. Always wear safety goggles to protect your eyes from flying debris. If you’re drilling into materials that produce a lot of dust, consider wearing a dust mask as well. And don’t forget about hearing protection for louder drilling tasks!
The Verdict: Are Ferrex Drills Reliable?
Based on customer reviews and expert opinions, Ferrex drills generally offer good value for money. They’re known for their durability and performance, especially considering their affordable price point. However, like any tool, their reliability can depend on how well they’re maintained and used.
Battery Life: Keeping the Power Flowing
For cordless Ferrex drills, battery life is a crucial factor. Most models offer between 1-3 hours of continuous use, depending on the intensity of the task. To maximize battery life:
- Avoid completely draining the battery before recharging.
- Store the battery at room temperature.
- Use the appropriate speed and torque settings for your task to avoid unnecessary battery drain.
Masonry Magic: Can Your Ferrex Drill Handle It?
If you’re planning on drilling into brick, concrete, or other masonry, you’ll want a Ferrex hammer drill or combi drill. These models have an additional hammering action that makes them effective for masonry work. However, for extensive masonry projects, you might want to consider a dedicated rotary hammer drill.
Adjusting Torque: Fine-Tuning Your Drill’s Power
The torque setting on your Ferrex drill allows you to control the amount of force applied. Lower settings are great for delicate tasks like driving screws into soft wood, while higher settings are better for tougher materials. Most Ferrex drills have a ring near the chuck that you can rotate to adjust the torque. Experiment with different settings to find what works best for each task.
The Warranty: Your Safety Net
Ferrex drills typically come with a warranty, often ranging from 1-3 years. This can provide peace of mind and protection against manufacturing defects. Be sure to keep your receipt and register your product if required to take full advantage of the warranty.
Storing Your Drill: Keeping It Safe and Ready
Proper storage is key to maintaining your Ferrex drill. Here are some tips:
- Store in a dry place to prevent rust and corrosion.
- Use the carrying case if provided to protect from dust and impacts.
- Remove the battery from cordless models if storing for long periods.
- Keep drill bits in a separate organizer to prevent damage.
Choosing the Right Ferrex Drill for Your Project
When selecting a Ferrex drill, consider:
- The types of projects you’ll be doing: Light assembly? Heavy-duty construction? This will guide your choice between cordless, corded, or hammer drills.
- Frequency of use: If you’ll be using it often, invest in a more robust model.
- Power needs: Check the voltage for cordless models or amperage for corded ones.
- Comfort: Look for ergonomic designs if you’ll be using the drill for extended periods.
- Additional features: Some models come with LED lights, multiple speed settings, or keyless chucks.
Remember, the best drill for you is the one that meets your specific needs and budget.
Wrapping Up: Your Ferrex Drill Adventure Begins
Congratulations! You’re now equipped with all the knowledge you need to choose, use, and maintain your Ferrex drill. Remember, a good drill is more than just a tool – it’s a key that unlocks countless DIY possibilities. So go ahead, pick up that Ferrex drill, and start turning your home improvement dreams into reality. Happy drilling!
